Local Archeology

February 10, 2024

How an inside joke turned into a environmental cleanup
View the photo gallery

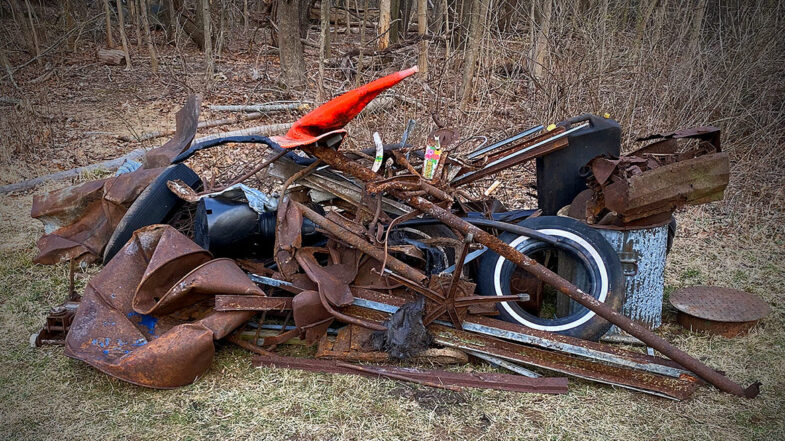
A pile of trash pulled from the local nature preserve. Items include tiles, a traffic cone, pipes, oil drums, trash cans, a manhole cover, plastic pots, fence posts and scrap metal.

Background

When first moving into our house, my wife and I would find little items while digging around our yard. Antique nails from when the house was first built, marbles and toys from the kids who lived here before us, a hinge off of one of the shutters — just little things like that which I started calling “local archeology”. If we found something interesting, I would photograph it and post it on Instagram. Nothing too special and without any real plan. It was just an inside joke between us that I started using as a hash tag.

We’re lucky enough to live across the street from a state nature preserve and as we settled in to our new neighborhood, I began noticing more little things. Most notable was the trash and litter that would build up on the fence line with the preserve. Now, as I would stand around in the yard enjoying a cigar, this really started to bother me. I wanted to enjoy the expanse of forest in front of me without the eyesore of litter ruining the experience. Being of the “see a problem, solve a problem” persuasion, I started wandering across the street and picking up any bottles, cans or plastic bags that I would find along the fence line in front of our house.

Unfortunately, the more I looked beyond the fence deeper into preserve, the more trash I saw. A bit disappointing, but still rather ignorantly undaunted, I started heading into the park with a couple of five gallon buckets to pick up the trash along the roads near the house. The deeper I wandered through the trees through, the bigger the scale and magnitude of the problem became and the true beginning of this project began. What started as just picking up a stray beer can or coffee cup became pulling out large scale commercial and industrial waste from illegal dumping.

The more I looked, the further I explored, the more I found. Each time I returned from a collection hike, I would regale my wife with whatever weird piece of trash I found and if it was interesting, I would snap a photo and post it. The local archeology inside joke moved from our yard to encompass the preserve. As I discovered the serious commercial waste, my wife recommended I start documenting everything — even the mundane. The photo gallery is a summary of many (but not all) of the trash we’ve been pulling out the forest.

The Trash

Starting in March 2023, I started recording how many trash bags I packed full of litter on each hike. Here’s the break down.

MonthTrash Bags
March33
April6
May3
June4
July0
August5
September6
October6
November0
December5
Total68

Each bag has a 33 gallon capacity, so with one gallon weighing 8.33 pounds, it’s a maximum total of 275 pounds per bag for a total of 18,700 pounds or 9.35 tons of trash. In reality, every bag wasn’t always full and there’s no way I (nor the town sanitation staff) could even lift a bag that heavy. Let’s be conservative and say each bag averaged out to around 50 pounds for a total of 1.7 tons. Tons. Nearly, 3,000 pounds of trash collected into bags and removed.

And that’s just trash. We still need to factor in recycling. Every time it’s feasibly possible, I’m also sorting items into our local recycling bin for pickup. In a busy month of hiking, our 35 gallon bin is completely full and 90% of that would be pulled from the preserve. Certain weeks, I’m also including multiple smaller bags full of metal, glass and plastic. While I don’t have any hard data on the exact volume, I’d estimate a full bin about 30 times in 2023 for around 8,700 pounds or 4.35 tons of recycling removed from the park. 4.35 tons of trash that was just rotting in the woods.

Beyond the little stuff you can pick up and put in a bag, there’s also the big stuff. All the larger items that need to be dragged out, picked up by the city or taken to the county dump. Here’s a (partial) list of some of those big ticket items.

  • Gas stove (2)
  • Car frame
  • Car hood
  • Car rear differential
  • Car seat (2)
  • Window frame (2)
  • Cast iron bath tub
  • Cast iron sink
  • Car batteries (7)
  • Lawnmower
  • Exercise bicycle
  • Oil drum (5)
  • Planter
  • Tires (12)
  • Tractor engine
  • Fencing
  • Pipes
  • Cast iron tractor wheels (2)

It’s not until you start to see the totality of the situation that you begin to understand the level of damage. As I said, the numbers aren’t precise, but the pictures speak for themselves and I’m continually astounded (and dismayed) by what I find. I could go on and on about all the little weird things I’ve found.

The Gallery

Despite posting many photos of the smaller interesting finds on Instagram, I realized that many more were filling up my phone and hard drive. Hence the idea for a gallery to really show the effort in full. With only a couple of exceptions from 2022, the photos are all from 2023 and for the most part in chronological order.

The Design

The art direction doesn’t stray far from the general template I’ve been using recently for other single page projects. A header linking a back to the blog post, the main body of content and a footer with links off to other projects. From there, it’s a matter of styling and customization to fit the project theme.

The general inspiration comes from some of the archeology publications and sites. Sadly, they weren’t very inspiring as they’re designs were often outdated. About the most I could take from their pages was the serif headline, sans serif body copy pairing which, of course, isn’t very unique.

The color palette is Flexoki which is my new favorite as it speaks to my experience in print graphic design. The muted colors are warm and balanced. Admittedly, the design doesn’t take advantage of the full palette only using a few of the colors. It does use both light and dark themes depending on your settings. I’m fairly sure I’ll use the palette in future projects to really explore the full color set to see how they work across different design themes.

The fonts are Playfair Display for the headline (served locally) and Gibson for the body (served via Adobe). I really do love a heavyweight serif face and Playfair really looks great to convey a level of academic prestige (even if it’s a false notion). Gibson is used more sparingly as the gallery doesn’t really have much text. Again, the heavyweight version of the face are just fantastic and I really like how it looks for the subheads.

The Code

Like with the design, the basic template is the same as other recent projects using a CSS grid for the responsive layout. The only difference this time was to experiment with some column/row spans to mimic a masonry effect and showcase larger versions of some of the more interesting finds. It’s not a true masonry grid, but at certain viewport sizes, all the items nest and align nicely. At other sizes, gaps do appear, but that’s expected. There are Javascript libraries to achieve that true masonry effect, but here, where all the photos are the same aspect ratio, the JS overhead and complexity didn’t seem worth it.

Each photo has the opacity dimmed a little which normalizes on hover. This lets the photos blend a bit more with the color palette. On mouseover, they transition to appearing brighter and more rich which gives them impact. The photos can also be clicked on to open larger in a modal window. I’m using the a11y dialog script for the modal behavior. I experimented with adding a keyboard activated previous/next behavior to the modal, but kept getting the array numbering messed up in my Javascript, so I left it out. An update for another day or another project.

The Impact

It’s a fair question to ask: Is this work having a positive or negative impact on the preserve? I’d argue that it’s having a positive impact. I work from the motto of yes, there may be some short term disruption, but it results in long term benefits. Similar to the idea of “leave no trace,” I work to repair any soil disturbance and contrary to the “archeology” title, there is no digging of any kind. Likewise, I rotate the areas I work in over days and weeks to allow the wildlife to reclaim the space. I’m also time limiting my work, so that I’m not in the area for more than an hour or two at most.

There is, of course, also an impact on me. I love walking in the woods and coming upon a new debris field or trash pile can turn my emotions upside down. Sometimes it makes me angry and frustrated. Other times, just sad and disappointed. Sometimes, its just too much and I can’t handle tackling an area as it just feels overwhelming. I’m starting to realize I need to work on a better balance to approach the work only when I’m in the right state of mind. On the positive side, there’s is a sense of pride when I’m able to remove a giant piece of junk from the preserve. I’m also stubborn, so I keep going back for more. It’s almost like to trying to finish a video game quest as it taps into your competitive nature. Maybe one day, I’ll come back from a walk with an empty bucket.

The Future

One of things I’ve come to notice is that the forest wants to get rid of the trash. It wants to be healed. Bottles and cans seem to be pushed up from the soil. Storms, rain, snow and animals uncover items bringing them to the surface. I can pick an area clean only to come back a month later to find more. I have to remind myself all the time that I’m not going to find it all today.

Will I continue? Yeah, most likely. There are three areas of commercial dumping (one in a federally protected wetlands) that I haven’t tackled yet. I know those areas will weigh on my mind if I don’t try to clean them up. I’m not going to stop walking in the woods and the benefits of doing that (exercise, fresh air, quiet) make the potential emotional turmoil worth it. I do get to see amazing things on almost every walk and I’m now starting to learn (and report) more on the ecology for my wife and her non-profit.

Finally, a thank you and shout out to the local sanitation department who has unwittingly been helping with this effort. I can only imagine what they’re thinking when the roll up to our house and see what I’ve put out for collection. Same goes for the county hazardous materials recovery facility. They’re always friendly, helpful and accommodating when I bring in a truck load of crazy stuff.

Please don’t litter.
View the photo gallery

Civil Defense

July 1, 2023

Redrawing the original set of civil defense badges from the United States Civil Defense Corps created in the 1940s.

View the project page.

As has become apparent over the last few years (and even decades and centuries before), we are each responsible for our own safety as well as the safety of our communities. It seems this is a lesson we forget and relearn in a cycle of storms, accidents and tragedies. This concept of mutual aid is once again in vogue and becoming more prominent as we begin to see epic environmental changes occurring in our own neighborhoods. When “once in 100 year” events start happening every year, we’ll need to pool our resources and efforts to survive the floods, droughts, storms, fires and freezes.

Luckily, we’ve done this before. During WWI, the U.S. government started what would later become known as the Civilian Defense Corps.

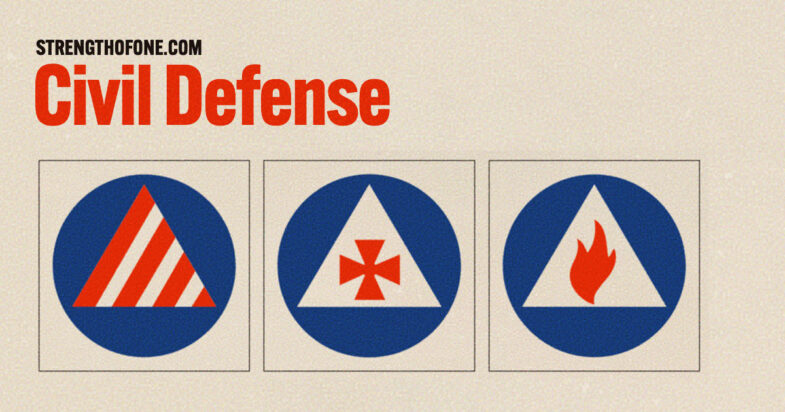
A set of three civil defense logos from the illustration project.

Reading up on the history, I was excited to see that each group had their own badge and more importantly — they were awesome. Really great, simple yet functional pieces of graphic design united in theme and purpose. Unfortunately, as I searched further, I couldn’t find much about the logos nor could I find the badges themselves. So I set out to redrawn them based on an original document from the period. And that inspiration provided another opportunity to work on a little web design and development to showcase the badges.

The illustrations

Redrawing the badges looked difficult at first, but creating a base template for the logo with the appropriate shapes and colors streamlined the process. Are the final results 100% identical to the originals? No, but they are very close and faithful. I didn’t make any creative or editorial decisions (suppressing all my art director experience — I really wanted to realign each). Each was then exported to SVG and optimized for the web.

Design and development

Now that I’ve got a few of these one off pages created, the ramp up process is much quicker. It’s not quite a template, but it is a starter pack of sorts. The Rorsch project was a great starting point given the retro vintage styles used. But…I didn’t want that much retro. I didn’t need the super distressed paper, but did still want the look and feel of that old manual. I pulled a sample of the paper from the manual to set as a background-image and then applied a background-blend-mode of multiply against the base background color. I did the same for one of the standard grit textures I have on file, but with a different blend mode. Being able to set multiple background images via CSS is a real game changer in terms of design possibilities. I’ve used the same technique, but with gradients, in other projects to draw complex backgrounds instead of using a raster file.

The big change for this project was to try out using an SVG filter to add a layer of noise over the entire page. I tried a couple of different ways to get it to work properly and finally ended up putting the SVG filter into the CSS as a background image and then setting the mix-blend-mode to hard-light. I dropped the CSS class onto the html element so that it covered the entire page. Along with the fractal noise distortion, the hard light mode did change the colors a bit, but it works as it almost de-saturates them a bit enhancing the retro style.

For the type, I wanted to match the styles in the PDF source, but…I couldn’t go as far as to use that cursive subhead font. It was just too much. The sans serif headers are Alternate Gothic to get that compressed letter width. The serif is FF Seria and despite only being used once for the intro text, I still wanted to try to match the style of the manual. Both are served via Adobe fonts which isn’t ideal from a performance standpoint, but it is convenient. I do wish Adobe would come up with a self-hosting option for customers.

All the SVG files are loaded via a standard img tag with a figure tag which allows adding a figcaption tag inside to drop in the badge name.

Packaging up the set of SVG files for a download was the final step. Hopefully, we don’t need them in the future, but it’s always a good idea to be prepared!

View the project page

From Screen to CSS

March 27, 2022

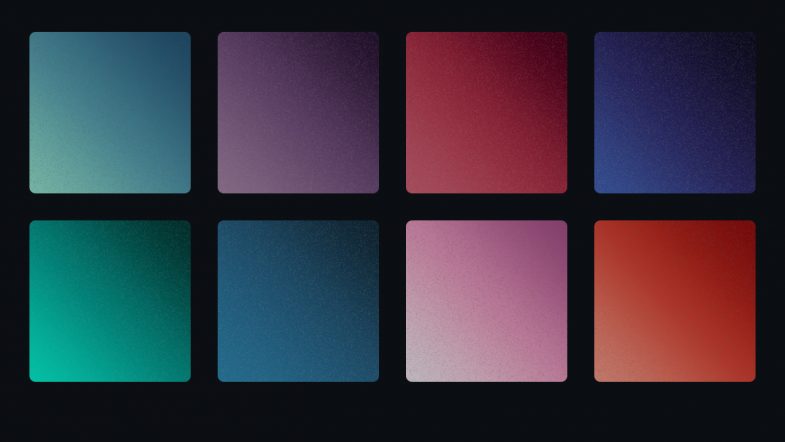
A sample of the UI color gradients from 2001 A Space Odessey

Creating CSS Gradients of the UI Screens in the movie 2001: A Space Odyssey

View the gallery and download the style sheet

Inspiration is a weird and wonderful thing. When it strikes, it generally locks in and will not let go. The idea keeps coming back around in my head and regardless of whether it fully comes to fruition, I have to chase after it.

Last week, I randomly came across a showing of the epic science fiction film, 2001: A Space Odyssey. As a science fiction fan and lover of the movie, I settled in to watch it again. Whenever you re-watch a movie, you’re bound to notice new things and this is especially true with a movie like this one where there is very little dialog and hardly any background music (apart from the classical pieces). There’s just so much open silence that you tend to focus in on other details.

What struck me most (again?) was the user interface screens used throughout the station, ship and pods. Now, the HAL 9000 is fairly established as a cultural reference and although the astronauts mostly interact with HAL via voice, it’s these UI screens that display information. The movie is such an epic force that it’s been dissected many times before by folks smarter than me so I won’t go into all the myriad details of things such as the typography. (Okay, maybe just a little bit of typography goodness later on.) The important thing I really focused on in this latest viewing was the color of the screens.

Each screen — and there are multiple displayed at a time — has a subtle, unique color gradient background. Reds, blues, purples, greens and grays. I’m not sure how the colors relate to the information or purpose, but there’s both a vibrancy and softness that I’m fascinated by. Part of it is probably the contradiction between the film trying to look futuristic while using 1960’s technology. Long before LCD screens, long before flat panel screens, long before high density displays, the film was attempting to predict what a user interface “screen” in a space ship would look like. And yet, it does an excellent job. The actor hairstyles feel more dated than the screens!

As I’ve mentioned, I’m a big fan of the movie, so over the decades I’ve always taken an interest in screen savers, desktop backgrounds and illustrations related to the movie. For me, HAL is a great foil for our modern relationship with our computers. Heck, my laptop crashed just today for no reason at all that I, as a mere human, can discern. All that was missing was HAL saying, “I can’t do that Dave.”

So with my interest in the movie art direction piqued once again, I was inspired to dig around find out more.

Concept

My idea was to recreate or capture those colors in a modern way, specifically in the way I’ve been focused on for work. I’ve been doing a ton of work on color for the web and with a bunch of new color models coming online soon, the way we see (and create) color on screen is going to change significantly. My idea was to use what I’ve been learning about CSS color to create a style sheet of color gradients to try to capture that magnificent soft glow of those science fiction screens.

Research

My initial research was driven by a memory. You know that thing where you remember seeing something online, but you can’t remember anything else? There should probably a new word for this phenomena. As I recall, there was a designer who created desktop backgrounds based on those screen colors. But…of course, I couldn’t remember or find anything in my searches.

The first project I did find — the HAL Project — is one of the old school originals. I do remember, the original screensaver as being tons of fun and using it at work always generated a ton of positive responses from scifi geeks. Looking it up again, it’s expanded into tons of materials which is awesome, although not quite what I was hoping for. Beautiful illustrations and typography, but flat color and more about detail than fidelity to the original.

Next I turned to a bunch of the UI and scifi blogs I love until I found the reference shots I was hoping for — actual screenshots from the movie itself. With these at hand, and finding nothing comparable to my idea, I was ready to try my hand at bringing these colors to CSS.

Process and Production

With references in hand, I began gathering pixel reference color samples to start building out the gradients. Starting with the basic HEX color space, I pulled three color samples for each screen: light, mid-range and dark. With those three values, I built out the initial gradients.


An aside on color and gradients

For years, creating gradients has always been difficult. Back in the day, creating a gradient in Photoshop or Illustrator was an effort in patience, often with poor visual results. Banding was a common problem leading the gradient to appear chunky instead of a smooth blend. A proliferation of tutorials featured various techniques and methods to achieve that holy grail of a beautiful seamless gradient.

Beyond the software, you also have differing color gamuts. Things that work in print, look horrible on screen (and vice versa). Even within each discipline, you have competing color models. Ask an experienced designer about color and you may get a long sigh. I still remember getting a “web design” from a print designer that used the completely wrong color space for the web. Every single color had to be converted and I had to explain why to the client.

Flash forward to today and you have multiple ways to write color values for the web. The long standing traditional methods of hex and RGB values are showing their limitations as new fancy monitors and screens are capable of displaying a wider range of colors. Gradients are an area where the RGB color space is showing its age leading to what some have called, the gray dead zone. Fixing this issue involves adding more stop points in the gradient and often times using a different color representation like HSL.


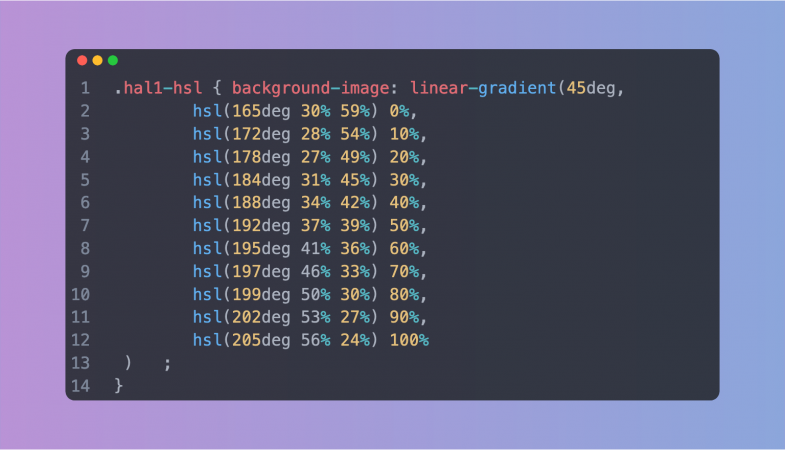
The idea was to set up unique CSS class names with a background attribute using a linear-gradient. Keeping it simple, the light color is set a 0%, the mid-range at 50% and the dark at 100%. Looking at the movie scenes, I settled on a direction of 45 degrees. I also set the class names as “hal” with a number in a nod to the movie.

Code sample showing the basic CSS class name and background linear gradient

Previewing them in the browser lead to multiple rounds of finesse to repeat this process to eliminate any banding and smooth out the gradients.

Something’s Not Quite Right

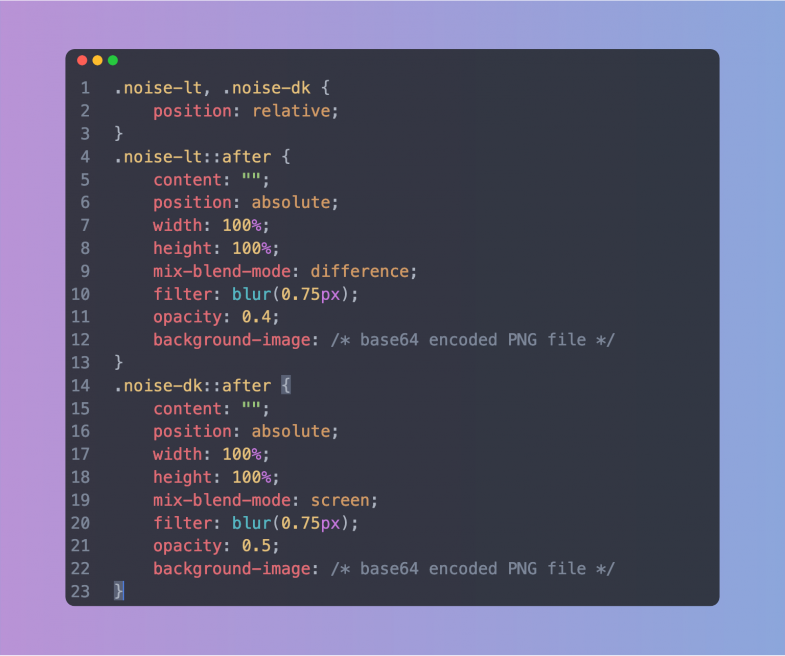
Getting the first few gradients smooth and looking good was great, but they also looked a bit too good. There was a lack of vintage to the colors. They somehow didn’t feel quite right. The solution was to create a couple of additional classes to add in some noise — just a touch to try to mimic the low resolution monitors used in the movie. The basic noise was created in Photoshop and exported as a small PNG tile. Since I wanted the final style sheet to stand on its on (and be ready to use), I ended up Base64 encoding the noise PNG file and dropping it into the CSS as a background image on a pseudo element of the class. It does make the CSS file significantly larger, but there’s no additional image file necessary (or to get lost). The noise was okay, but it still needed some finesse. Reducing the opacity, adding a bit of blur via a CSS filter and then setting a mix-blend-mode helped to make it more subtle. Of course, in dealing with blend modes, what works on a light color didn’t quite work on a dark color. This lead me to create two noise classes: one for dark gradients and one for light gradients, each with a different blend mode.

Code sample showing the CSS for the noise classes

Different strokes, different folks

With both the basic RGB gradients and the optional noise additions in place, I began thinking about re-creating the set using HSL (hue, saturation, lightness) color values. Why? As mentioned in the aside above, different color modes along with additional color stops can help create a smoother, better looking gradient. In working with color and gradients, I’ve definitely seen some dramatic differences. Plus, it gives people the option to work with, and customize, the set that they like best. So how best to do this? Luckily, there’s some wonderful tools out there to help. I ended up using this tool with eight color stops in a straight linear curve. These new HSL gradients were added into the style sheet. Since I had spent so much time getting the RGB versions as smooth as possible, I didn’t see a tremendous difference with the new HSL values, but you can be the judge.

Putting it all together

With the gradients looking good, I started having fun with the page design to really capture the spirit of the movie. The gradient swatches were set up using CSS display:grid and setting the columns to repeat(auto-fill, minmax(200px, 1fr)). This fills the parent container with swatches as long as they are a minimum of 200 pixels wide. Short and sweet, automatic responsive behavior. The columns contract and stack as the screen gets smaller. I set a small border-radius on the swatches to help them mimic the shape of the monitors in the movie, added a bottom margin for spacing and the swatches were set. It was then just a matter of replicating each swatch <article> with the appropriate CSS class.

The colors for the rest of the page elements were also pulled from the movie stills. The page background, the type color, the button colors — all are from the movie — albeit adjusted a bit to make them more harmonious with the overall design. Nothing fancy with the color modes here, just the basic hex colors sampled from the stills.

The typography was another fun aspect. The type choice was never really a choice as the movie (and many other scifi films) uses Eurostile almost exclusively in the ship screens. I used the extended variant of the typeface and transformed everything to all caps using CSS. But once I had the type set up and the text in place, it still didn’t look right. Or to be more precise, it looked too right. It looked like a modern page. The text was sharp and crisp which didn’t reflect the time period or the technology used in the 1960s. The answer was to add a tiny bit of blur via the CSS filter:blur() property. This really brought the overall design to life. The whole thing really started to feel like a vintage CRT screen. It really is all about the subtle details to create the feel of a project.

Overall, I think it looks great and I’m happy with the final colors. Is it useful? Maybe not, but perhaps you’ve got a project where you need some nice gradients. Or perhaps, you’re just a scifi fan and this is a good reason to watch the film again. Either way, I’m glad I took the time to add to the movie’s legacy in some small way.

View the gallery and download the style sheet

Books and Shelves

March 6, 2022

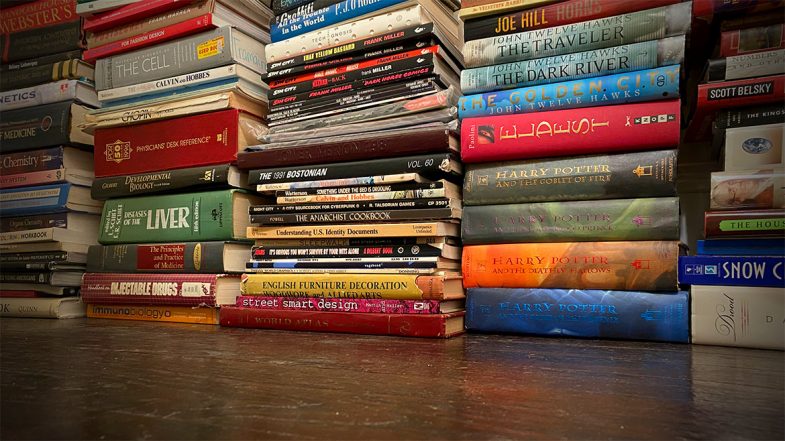
Stacks of books sit on a dark wooden floor

TLDR

View the virtual library

I love reading. Hence, I love books. All kinds from hardcover to audio to comic to magazine — I love them all. As a child, the library was one my favorite places to visit. I don’t think I’ve ever sold a book after acquiring. Ever. Really.

As you may imagine, this means I now have a lot of books. So many books. This wasn’t an issue when I lived in San Francisco and had a huge apartment. I filled it with book shelves and pilled in the books for display and easy access. But when I moved to New York, I knew that the tiny Manhattan apartment wouldn’t accommodate all the shelves or the books for that matter. The books went off into storage because I’d never willingly get rid of them and the shelves got sold, donated or recycled.

Flash forward and now I have a house with plenty of space. Almost immediately, I got all my books out of storage and moved them in. Unfortunately, I don’t have an shelves. Or at least, not nearly enough to hold all the books. Not even close.

So what’s a bibliophile to do? Well, as a temporary measure, I started by stacking them artistically around the fireplace. This was only okay. You can’t really grab a book like on a shelf. You can’t even really find a book. And when decorating a new house, piling stuff up doesn’t really scream “interior design”. It can work in some instances, but in my case, it was just…meh.

But if you’re a designer and developer as well as a bibliophile, you build a virtual book shelf on the web!

This was a great little project that let me play around with CSS grid techniques, design some new branding, work on my Javascript skills and look through all my books. I say “little” project as it naturally grew larger and larger to incorporate a bunch of little features and additions.

Inspiration

Initial design inspiration came from publisher sites like Thames & Hudson and Holloway as I knew I wanted a grid layout with good typography and minimal elements. On the development side, I was inspired by projects like Dave Rupert’s bookshelf albeit to a much less technical level.

Design

As I mentioned, it started out small and very much focused on the design. Typography was easy as I choose one of my favorite families, DIN, but getting the new color scheme right was more difficult. There was a lot of back and forth and experimentation to get the right balance of light tones while still maintaining enough contrast.

Basic content for each card was easy — title and author with a subtitle in some cases — but I also wanted to provide more organizational content as well. Hence adding the small text icons in the card footer to track with the filters in the navigation. As I was entering the info and building out the cards, I also started thinking about linking out for each book. Putting my UX hat on, I realized if I visited and found an interesting book, I’d love a link to find that book online. The hard part was then figuring out where to link to. I started out looking at the Library of Congress, but sadly found the site super confusing. For the comics and audio books, it was much easier. I found a comic price guide site that had a good search, cover images and details. This made it so I didn’t have to take my comics out of the protective plastic to figure out who the writer was. Audio books were also easy as we’re Audible subscribers, so our reading history is already in the system. I’m still a bit reluctant to link to Amazon proper for hardcover and paperbacks though. I’d rather link to a neutral site or a small independent bookshop. I put a pause on that for the moment, but it’s something I’m sure I’ll revisit. The Open Library project (linked below) seems to be the best option for the moment.

It’s worth noting that I did consider adding cover images to each card. In a few tests though, it really just added a level of chaos to the overall design. I was also worried about the performance impact. Hosting each cover image locally would be the way to go, but also presented a massive production challenge to gather and edit them all. Hot linking to a cover was an option via the Open Library, but again, adding the covers didn’t really match the card style. If the covers were the primary design element, I would have designed the cards entirely differently.

Development

Setting up the base CSS grid wasn’t too hard using repeat(auto-fill,minmax(320px,1fr)) to set up a “card” for each book in an <article> element. This also provided the built in responsive behavior so I didn’t have to use any media queries. Very nice.

The grid got a bit weirder though as I started setting up the interior of each card. I first dropped each book’s main info — title, subtitle and author — into a <cite> element to try to be as semantic as possible. The hard part was getting the categories indicators to sit at the bottom of each card. The key turned out to be using a grid on the container <div> for the details and using flex-end on the align-content property. I find things like this the most confusing part about CSS grid — layouts with columns within columns. I’m guessing the new subgrid specification will help with this once it becomes widely available.

It’s worth noting that there wasn’t any consideration on the volume of books or how best to store the data. I just picked up the closest book and entered the information directly into the HTML. The limitations of this approach, while somewhat romantic in it’s old school “let’s not complicate things” way, definitely became more apparent as the amount of books grew and grew. Still, being just text, the HTML file is still less than 500kb which isn’t unruly. If I were to start over. I’d probably drop all the book data into a JSON file to reference. Maybe in a future update I’ll tackle moving the data over to an external file and set up some sort of update interface form.

Organization: A shelf is not a library

While I started this project thinking of it as a “bookshelf”, the more I dug into the details, the more I realized I needed to add in extra information to make it actually valuable. Specifically, categorizing each book type really helps people (and myself) explore the page. So what was initially a bookshelf morphed into what is really a library. Categorization and nomenclature inevitably raises more questions that define the context. Is a graphic novel also a comic book? What about when I have both a paperback and the audio book version? Do I tag the book with both? Tackling each of these questions slowed down the progress a bit.

With general book categories set out, the next step was to create a filtering system and to show/hide the books based on the selection. This wasn’t too hard as they’re were multiple ways to handle it. I choose defining the categories as CSS class names, but I easily could have used data attributes as well. Technically, I’m not sure using empty CSS class names is an appropriate data strategy — as there’s no real styling at all — but it was less verbose than data attributes. I’ve been using data attributes more and more with other projects recently, so maybe I’ll go back and switch everything up in a future update. Seems like they’ll go nicely with the switch to a JSON file.

The filtering script set a CSS “show” class to each card on page load. The show class sets the display property to grid and the opacity to one. Without the show class, the display property is set to none. Of course, we can’t animate the display property, so the effect is a bit of a snap. I included the opacity change as a bit of wishful thinking. Perhaps in the future we’ll be able to animate the display property. At the same time, we also change the active state of the filter button to indicate which filter is in use. This basically just applies a set of new CSS rules to the active button.

Another organizational challenge came as the amount of books grew and grew. Since this project really started as a design challenge with just a few books, I never gave any thought to what it would look like with hundreds of books. Or how it would perform. I was just adding books while watching television or while drinking coffee in the mornings. There was no order at all. Thinking alphabetical by title was a safe way to initially list the books, I grabbed a little script to reorganize them on page load. From there I grabbed the source code from the browser and dropped it into the HTML file. From that point, I used the newly alphabetized list as the master file.

The filters were great, but still left a ton of books in any category. A viewer didn’t have much hope of finding a particular book or author. It was clear that a search option of some sort was necessary. This was easier said than done and I struggled with various implementations. Early attempts had two search forms — one for authors and another for titles. Each triggered on the keyup event without a submit button, but never seemed to work properly. Or rather, it worked occasionally. Sometimes the search conflicted with the filter buttons. Other times, it didn’t find a book on the page. I was never able to really figure out what was causing the errors and put it on hold and focused instead on adding more books.

Luckily, putting down a project is often (always?) the best way to gain the necessary perspective. Happens all the time with design and when I approached the idea of a search function again months later, I was able to get it running with a new form and implementation. This time around I used a single search field and a full page text search rather then trying to scope it to just the title or author content. As mentioned, the search is triggered on keyup which means we don’t need a submit button although I’m not sure I’ve covered off on all the accessibility features with this approach. It’ll need to be revisited with some more testing. One cool thing I read (somewhere, sorry!) was to add in a bit of a delay between the keyup and returning the search results. It makes it a bit less jarring and therefore, somewhat more human.

Of course there is

Now, I was never under any illusion that creating this was a unique idea, but it wasn’t until I was deep into the project that I found a bunch of other full fledged library software options. At which point, I was tempted to give up and see about using one of them. Sure, it would mean putting aside a lot of work, but in theory, a more robust application would provide me with a lot more options in terms of cataloging, updating and maintenance. Plus, creating a custom theme or template for an application is something I’m well versed in doing.

Readerware was the first I found, but it seemed a bit clunky. Yes, I’m being judgemental about the look and feel of the site, but it felt dated somehow. It also appears to be more general — including music and video cataloging — which I wasn’t really interested in. Plus, cost.

BookWyrm was the second I found, and while I applaud it’s decentralized, anti-corporate stance, I wasn’t looking for a social community. The docs even mention that cataloging is a secondary feature and not it’s primary role.

BookStack was the third and best of the apps I found. Free, open source, self hosted and it looks like a great wiki option. Finding it definitely made me throw up my hands and consider scrapping the entire project. The only thing that prevented me from giving it a spin was the hassle of dealing with the server install stuff.

Curation and honesty

One thing I tried hard to avoid was censoring myself. Fifty years of collecting books, sometimes from blind auctions, leaves one with some very odd titles. Even though I sometimes cringed as I found certain titles, I wanted to be honest. Honest as a librarian. It can be hard not to judge your younger self, but I wanted to showcase all the books — all the wild, weird and wonderful titles I’ve read over the years. So there’s some real oddballs in there if you dig in deep enough. I’ve always said “ignorance kills” and didn’t want to abandon that principle just to salve my ego from a bit of embarrassment. Perhaps the answer you’re looking for is in the collection.

View the virtual library

Unsmilely

January 24, 2021

Unsmilely Icon Set

There’s a natural ebb and flow to projects. An initial burst of inspiration creating momentum that slowly fades as the hard work and all too often, the insecurity sets in. This is one of those projects.

Originally drawn in 2017, it’s hard to recall the exact source of inspiration, but in hindsight, they seem a reaction to both the political landscape at the time as well as the sugar saturation of skeuomorphism in the standard emoji world. Like in my symbology project, these are a study in the reduction of the extraneous to reveal the core.

I think the other goal, given their simplicity, was always to animate them. The only question, and this is where the project ebb started, was how to best create the animation. And so, what started out as an excuse to learn new software applications — a tedious task which sucked any joy out of the project via frustration — led to stagnation. It was only recently when my web work sparked the idea of animating these via CSS. Now, there was still a ton of learning to do with this CSS only approach, but at least I had a stronger foundation having done it before with small things and these icons are in essence, a gr0up of small things.

Here’s a quick video demo of the animation.


And for those more inclined, here’s a Codepen with all the HTML/CSS.

See the Pen
Unsmilely Icon #1
by strongest (@strongest)
on CodePen.

The full collection on Codepen is available here: https://codepen.io/collection/XjoBzV

Or download the complete set to get the images.

Xtra

March 29, 2020

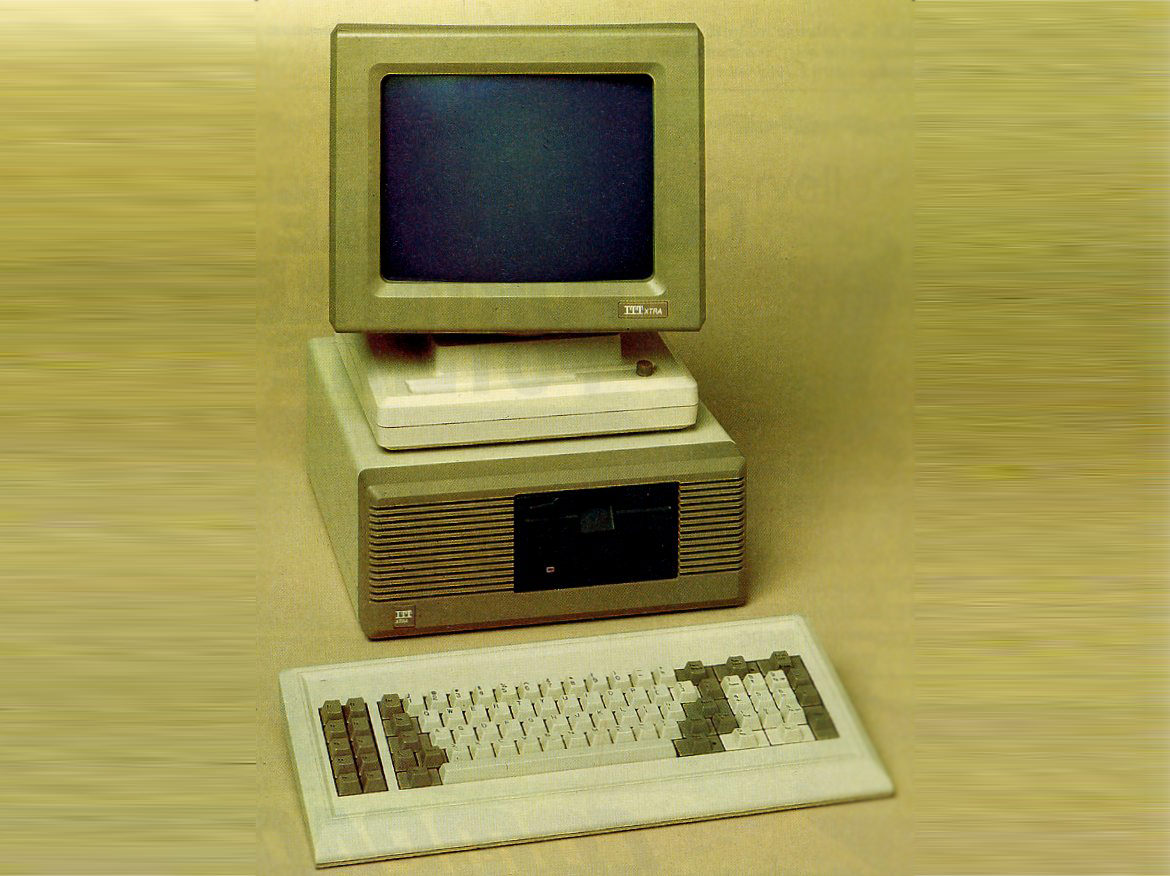
Photo of an ITT Xtra computer circa 1984

I have been using computers for over 35 years. This is quite a statement and one that makes me appreciate all the bad ergonomic decisions I’ve made along the way. In fact, it was a diagnosis of tendinitis in my elbow and subsequent introductory questions from a doctor that made me even realize that my relationship with computers had been going on so long.

“Do you use a computer for work?” Yes.

“How long have you been using a computer?” Uhhh, years? Decades? A long, long time.

And I didn’t really have an exact answer. Which got me thinking, because it seems like something one should know about oneself. I’m in the first generation when it comes to personal computers (which may lead to another longer post topic).

The ITT Xtra is the first one I ever really explored. My parents bought it one Christmas and I can still remember first seeing it set up on the kitchen table. No box, no wrapping paper, just sitting there like an alien. Now, to be fair, I had been using computers for some years before this — they were starting to show up at friend’s houses and my middle school had purchased a bunch of TRS-80s to stick in a science class.

But there’s a difference between “using” and “exploring”. It wasn’t until this showed up in my house that I was able to spend unlimited hours learning what it could (and couldn’t) do and by extension, what I could (and couldn’t) do with it. My siblings were too young to care much about it and my parents were too busy to learn it, so I became the default user for the house.

“Give ITT a round of applause for including clear, profusely illustrated documentation with the Xtra. This little extra touch is worth it’s weight in gold.”

Creative Computing, 1985

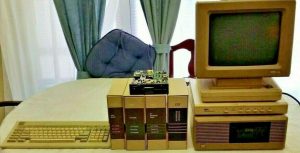
ITT Xtra computer with manuals and extra hard drive

Not an actual photo of my Xtra, but those manuals were fantastic!

It was that “profusely illustrated documentation,” as seen in the photo above, that gave me any chance of understanding how the computer worked. Beyond using the word processing program to write all my school papers, it was here that I began to make the early connection between code and art. The idea that you could program the computer to make art. This was an astonishingly profound revelation — that graphics on screen were directly tied to code — basically text. It wasn’t long, and it was probably the first thing I wanted to do with the computer, before I was writing screen graphics in BASIC.

Seeing the light

One of the coolest features was, of course, the amber monochrome monitor. While I may have had some initial trepidation because I had never heard of the ITT brand before, I was immediately won over when I learned that amber monochrome monitors were easier on the eyes than the traditional green monochrome monitors that everyone else had. Remember, I was a teenager with all the misguided fears, self-doubt and imagined peer pressure that accompanies those years, so having something — anything — uniquely cool was a big deal. Even if the claims about amber monitors weren’t necessarily true.

“An amber screen was claimed to give improved ergonomics, specifically by reducing eye strain; this claim appears to have little scientific basis.[3] However, the color amber is a softer light, and would be less disruptive to a user’s circadian rhythm.”

Wikipedia

So where does all this nostalgia lead us?

It’s led me to create a new page on the site using the style of my old original amber monochrome monitor. It’s a flashback to what it was like for me to work on that first ITT Xtra computer — amber, bitmap fonts on a black background. To that end, I’ve been toying with the idea of including a client archive page on the site. These two ideas were perfect for each other — a long list of text in a table with a retro design style.

The design itself is by it’s very nature, basic. I started by finding the perfect shade of amber, not necessarily in terms of accuracy, but more on an emotional basis dredged up from some sort of color memory library. Next up, was choosing the perfect bitmap font and I do love a good bitmap font. In this case, historical accuracy won over nostalgia as I was able to find the exact font files used on the ITT Xtra. From there, it was more of a matter of web development to bridge the gap between the old and new.

Now of course, it’s not an exact replica to the original, mostly due to the underlying technologies involved. The two big differences being the monitor construction and the text rendering engines in modern computers. Those old monochrome monitors made for much crisper text. So the way your laptop screen is built makes the text a little blurry (on the plus side, it has more than one color). The second difference is how your computer renders the text itself — usually via anti-aliasing or subpixel rendering. While I can’t overcome modern displays, I have included some CSS to help recreate that old text rendering.

Along the same lines, I’ve also chosen to use another old technique for the page — loading the client list data via XML and a deprecated Javascript library from Adobe called Spry. Now, admittedly, this has nothing to do with my old ITT Xtra, but it was a fun bit of nostalgia to use again. Old school web designers will fondly remember (or not) that thirteen years ago, loading data into a web page (without a database!) was super cool. At some point, I may swap this out for actual on page data which would be better for performance, accessibility and longevity.

In the meantime though, and without further ado, venture back in time to experience the dawn of personal computing.